Keycloak
Les urls
- Url géneral: https://auth.ppsfleet.navy
- Pour gérer ses infos: https://auth.ppsfleet.navy/realms/Ppsfleet/account/
- Pour l'interface admin de ppsfleet: https://auth.ppsfleet.navy/admin/Ppsfleet/console/
TODO:
Configurer le login avec une clé yubikey ou autre (fido2 protocol)
https://refactorfirst.com/setup-fido2-passwordless-authentication-with-keycloak
https://www.aukfood.fr/les-differents-modes-dauthentification-sous-keycloak/
Installation (generic avec podman)
WARNING: verifier la version installé pour pas faire une descente de version.
podman create --name keycloak-26.0.7 \
            -v /opt/keycloak/themes:/opt/keycloak/themes \
            -p 127.0.0.1:9050:8080 \
            -e KEYCLOAK_ADMIN=master \
            -e KEYCLOAK_ADMIN_PASSWORD=... \
            -e KC_DB_URL=jdbc:postgresql://10.88.0.1:5432/keycloakdb \
            -e KC_DB_USERNAME=keycloakdb \
            -e KC_DB_PASSWORD=... \
            -e KC_DB=postgres \
            -e PROXY_ADDRESS_FORWARDING=true \
            quay.io/keycloak/keycloak:26.0.7 \
            -Djboss.bind.address.private=127.0.0.1 \
            -Djboss.bind.address=0.0.0.0 \
            start --hostname auth.ppsfleet.navy --proxy-headers xforwarded --http-enabled true
Voir la page podman pour faire un service
Gérer le service
# sudo -iu keycloak systemctl --user start keycloak-26.2.4
systemctl start keycloak
# will run the right systemd command as user
Les services:
I - Bookstack
- https://github.com/elexis/elexis-environment/blob/master/docker/ee-util/assets/stage_ee_start_setup/keycloak/bookstack-saml.json
- https://github.com/BookStackApp/BookStack/issues/1157#issuecomment-585804153
AUTH_METHOD=saml2

# Set the display name to be shown on the login button.
# (Login with <name>)
SAML2_NAME=ppsfleet

# Name of the attribute which provides the user's email address

SAML2_EMAIL_ATTRIBUTE=email
SAML2_EXTERNAL_ID_ATTRIBUTE=username
SAML2_DISPLAY_NAME_ATTRIBUTES=firstName|lastName


# Enable SAML group sync.
SAML2_USER_TO_GROUPS=true

# Set the attribute from which BookStack will read groups names from.
SAML2_GROUP_ATTRIBUTE=Role

# Removed user from roles that don't match SAML groups upon login.
SAML2_REMOVE_FROM_GROUPS=true

# Name of the attribute(s) to use for the user's display name
# Can have mulitple attributes listed, separated with a '|' in which
# case those values will be joined with a space.
# Example: SAML2_DISPLAY_NAME_ATTRIBUTES=firstName|lastName
# Defaults to the ID value if not found.
#SAML2_DISPLAY_NAME_ATTRIBUTES=username

# Identity Provider entityID URL
SAML2_IDP_ENTITYID=https://auth.ppsfleet.navy/realms/Ppsfleet/protocol/saml/descriptor
II - Nextcloud
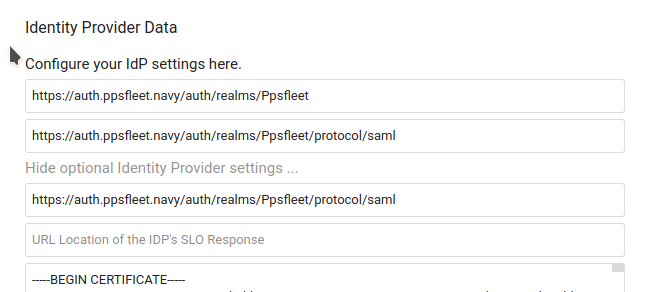
https://auth.ppsfleet.navy/auth/realms/Ppsfleet
Si il y a une erreur du type: "account not provisioned" c'est durement un problème de certificat.
Le certificat se trouve dans keycloak: Realm settings > keys > algorithm RS256 > Cetificate
Il faut le mettre dans les paramètre de nextcloud: SSO and SAML authentication > show optional Identity Provider settings > dernier champ
Config:
Identifier: https://auth.ppsfleet.navy/auth/realms/Ppsfleet
Url target: https://auth.ppsfleet.navy/auth/realms/Ppsfleet/protocol/saml
III - peertube
" https://auth.ppsfleet.navy/realms/Ppsfleet/.well-known/openid-configuration "
le client secret est dans l'onglet credentials de keycloak (celui du screen est plus valide)


Pas de commentaires